Showing posts with label kitchen remodel. Show all posts

Tuesday, November 15, 2011

Project Reveal

After - Kitchen

Some of my photos are complete on this remodel project.  I still have another photo day to schedule in, but I thought I'd share a few of the areas today.  I've got before and afters of the kitchen and family room. 

Before - Kitchen

I shared a bit about this project HERE in a previous post.  The homeowner had all of the furnishings, art, rugs, etc. and I was challenged to remodel the home to feature all of her wonderful things and show them off in their best light.  She wanted the same warm, comfortable feel that many of her antiques and collected pieces possessed.  As an artist, working in textile and jewelry design, she has quite an eye for detail and most of her things had been acquired while living overseas in Pakistan and Kazakstan.  She has collected the things she loves..... antique textiles, beadwork, woven tapestries, and rugs.

The house was built in the early 90's and the whole thing was mauve, paint, tile, counters, exterior, everything, except for the cabinets which had turned orange over the years.  She definitely wanted a warmer, more rustic feel.  New wood floors throughout warmed up the space as did the warm white paint color that was used on everything, walls, ceiling, mouldings, and cabinetry.  I wanted a gallery-like backdrop for her colorful, textural pieces and the wood floor grounded everything.

After - Kitchen

The kitchen was very dated, with an oddly shaped island. I wanted to get rid of the raised bar counter. It served to divide the kitchen and felt like one side was a corridor and the other the kitchen. With the island at one level, it encourages everyone to come to the center "table". We kept the perimeter cabinets and painted them the color of the envelope to minimize them and draw attention to the new, beautiful wood island.  The antiqued limestone counter on the island has an interesting texture with fossils and shells embedded and just feels wonderful to the touch.  Those slabs came from MCA in Houston and they are called coral reef. The bone limestone backsplash, material also from MCA, blends with the envelope and repeats the material.  I love the way the Visual Comfort Goodman hanging lamps punctuate the light colored space with their simple shape.  We purchased those through Circa in Houston. The Rohl faucets add so much to the kitchen too.  They're in the Tuscan brass finish, a living finish, that will age over time. 


After - Kitchen


Before - Kitchen island


Before - Island

It was definitely time to remodel.  Could the finishes be any more dated??


After - Family Room

This is the family room, beyond the kitchen.  You can really see her collections here. That suzani tapestry is an antique and she's had it for years.  She didn't do this because it was trendy!

We continued all the finishes in to this space and ripped out the old entertainment center built-in.  I felt it needed the richness of the wood here, so the floor material came up on the wall and provided a stopping place for your eye.  The wood grille panels in the cabinet doors were custom made to repeat some of the texture in the room.


Family Room Entertainment Center


Before - Family Room

Check out the grillework on the cabinet doors below.  Great for airflow to the equipment inside and adds so much interest to the large built-in cabinet.


 cabinetry under construction

The counterstools were custom made, really the only new furniture item. 


I'll save the living room and master bath for another post.  The homeowner has a couple of cats that we did not ignore. You should see the special place we made for them! 

All after photos by Miro Dvorscak

Wednesday, September 28, 2011

Remodeling - Do Your Homework


I'm doing so many remodel design projects these days.  Our area is full of 20+ year old homes that need some TLC.  If you are thinking about remodeling whether it's kitchen, bathroom, an addition, whatever, this is what you should be doing whether you are hiring a designer or not.

1.  We've all heard this....start building a photo file for style ideas so that you can narrow down what you want your end result to look like.  The most important thing to pinpoint here is the atmosphere or feeling about the space.  If you just start to pull things that appeal to you, you will begin to see a pattern.  That pattern will dictate the overall design scheme for your space.  For some clients that translates to a hard binder with categories divided up, or it can also just be some photos found online. I tell all my future clients to go to houzz.com and build an ideabook with their own annotations.  They just e-mail me the link.  We've gone all paperless now you know!

2.  In your file you can also get specific.  If you see some tile or cabinetry or paint colors, etc. that you LOVE and would like to have in your space, save that photo and note what it is you love about it.  I would advise not to get too married to any one item you've identified though.  The most important thing is identifying the overall look you want. You might fall in love with a specific item that doesn't really work in that particular design direction you like. I had a client who fell for an onyx harlequin mosaic tile for her bathroom.  She wanted an Asian contemporary bathroom.  Um-hmm....didn't work out so well. 


3.  If you are doing a kitchen, start researching appliances. These are very personal and there is such a wide variety of types and qualities available.  While a designer can advise on style or finish, you will be the one using it, so do your homework and visit some showrooms and start looking at pricing. The biggest part of a kitchen remodel budget outside of cabinetry is usually appliances. Deciding between something like the Kitchenaid Architect's Series or Viking/Subzero will make a huge impact on your budget.  It's also very important to the layout and electrical/water locations.


4. For a bathroom, start researching plumbing fixtures. Again, these have a huge range of quality and price. It helps to understand how much things cost so that your mouth doesn't fall to the floor when you get your quotes in from the contractor. So you want a Waterworks tub and a car wash shower. Do you know how much that costs?

5.  Costs.  Think about your budget.  How much can you spend on this space? Is it enough to do what you want?  In a kitchen remodel, if you figured out your appliances and generally know what to budget for that, then you can kind of see how it's stacking up relative to how much you have to spend.  For example, if you have $50,000 for a kitchen remodel and have decided to go all high end on appliances, then you've basically already spent your budget. If you've got $25,000 to spend on a bathroom and you want a $10,000 tub then you will need to make another selection.  I think it's important in any remodel to bring everything up to the same level of quality.  Don't leave something in the room that is going to bring down the rest of your renovation.  I also think you shouldn't spend all your wad on one thing and have everything else be mediocre. 
 
$$$$$$$$$$$$$$$


6.  Allow time.  You need time to plan this properly.  It takes about 2 months at least to get a design for a space with selections done ready for a contractor.  That's me.  All designers are different.  And if you're a homeowner doing it yourself, it may take longer.  Typically, if my client is paying for my services for complete project, then we have a bid packet that will go out.  It contains the floor plan, elevations, details of cabinets and/or how finishes stop and start, electrical plan, finish specifications, and a finish schedule, as well as general construction notes, cabinetry specifications, and then the fixture specifications.  By fixtures I mean, lighting, plumbing, hardware.  If we can get all this tied down and specified, it makes it sooo easy for a contractor to price out and build. It's easier to get multiple bids and compare apples to apples. 


Typically people want their homes tidied up and projects finished by Thanksgiving for fall projects and by summer for spring projects.  If you wanted a project done in the fall, you should have started back in the spring or no later than June booking a designer or designing the project yourself.  If you want a project in the spring, now is a good time to call to book a designer to start the design in October or November, if you want to be ready to start when the kids go back to school in January.  Most busy designers (and if they aren't busy, maybe that should give you pause) have to work projects in with others and need time to plan their schedules.   If you are doing this project yourself, you have to fit in shopping for tile, etc. with your life too.  Remember, you don't have all these suppliers at your fingertips.  You will have to do more running around and spend more time doing research so that you can figure out which supplier has what you want and what products are out there for you to use.


Now you're ready to start the design.  Be open minded, considerate, realize that going for the cheapest is not always the best, and above all, know that professionals in this field are not trying to take advantage of you or take your money for nothing.  It's in their best interest to make you happy.

Thursday, September 22, 2011

Repetition in Design


Jacqueline Derry Segura - House Beautiful

Repetition is one of the tools used in design to reinforce a concept.  It helps provide continuity, aids in making a statement, and celebrates that one element that is worth repeating. 

Color is one of the most common elements repeated in design.  In the bedroom above, the gorgeous citron color is repeated in the ottomans, lamps, headboard, and art.  A fresh, vibrant mood is created because of the repetition of that color.


Chantal Dussouchaud - House Beautiful

In this image, the map motif or theme is repeated.  It reinforces a global, traveled feel in the space.


Miles Redd - Elle Decor

The curvy silhouettes of the chairs, sofa, and window treatments repeated here evoke a feminine quality in this room.  The lipstick red color also contributes to that look, repeated as well.


Mark Cunningham - Elle Decor

The boxy shapes in the chairs, cocktail table, and window make a strong style statement of a masculine, almost business-like interior.


Laura Kirar - House Beautiful

These rectangular mirrors repeat the window shape and make for tall, linear look. It sort of celebrates the narrow window which could have been a negative at a bathroom vanity.


Tom Sheerer - House Beautiful

The repetition of bold patterns makes for a playful, interesting space. 


Dan Marty - House Beautiful

I love the textural interest repeated here in the rug, chair backs, and baskets.  It reinforces a casual, relaxed ambience.

In all these examples, the repetition of certain features helps strengthen the overall design intent.


In this accessible bathroom design I did for a client, a linear, horizontal line was repeated in plumbing fixtures, lighting, hardware, mouldings, and louvered doors.  A masculine, spa-like ambience was desired and the horizontal lines help create that feel in the space.


In this kitchen remodel, copper was used repeatedly to bring a French country look to the space.  Copper cabinet pulls, sink, faucet, and accessories helped make a statement.


I love the use of copper here.  It was just the right metal finish to compliment the soft color scheme.


Repetition in design is great for emphasis and I love to see it used successfully.

Monday, September 19, 2011

What To Do With Oak Cabinets


I have one project that was published a few years ago and again recently reprinted. After seeing Linda's post HERE at Lime in the Coconut blog about her bathrooms being published by the same magazine, it reminded me about my project.  (Nice bathroom, by the way! You should check it out.) 


Photo from my website

After several years I still get calls and e-mails from all over the country with people asking me specifics about the finishes and telling me that they have these exact oak cabinets.  Most recently about a month ago, someone from Anchorage, Alaska was interested in the slate floor. I forwarded her the info on my supplier and they both tried to work out various ways to ship it as cheaply as possible from Houston to Alaska.  It was terribly expensive to ship that far and luckily she found something similar in her area.  I thought it just goes to show you how much people sometimes want to make the best of what they have and well, really aren't interested in a white kitchen. I know, as much we all love a white kitchen here on the blogs...
not everyone wants one.

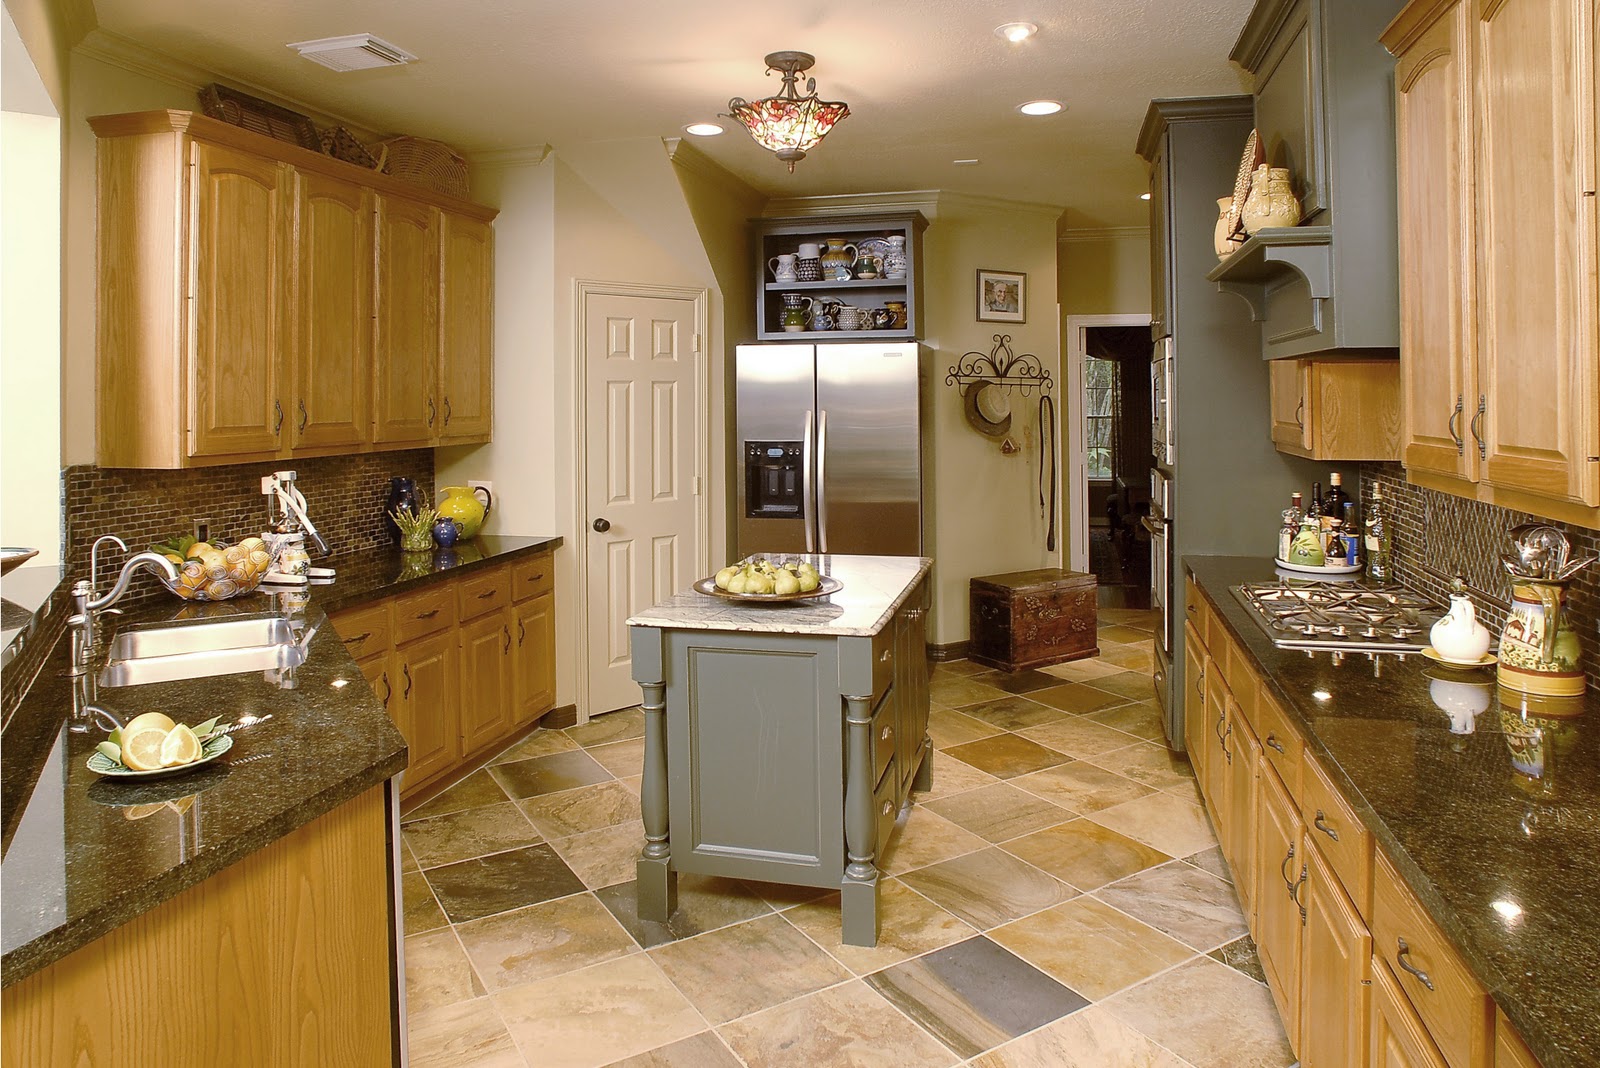
This project had miles of oak cabinetry.  The homeowner didn't want to paint them or change them all out for various reasons.  They liked a refined rustic/craftsman style look and love natural materials.  The challenge became how to make those builder standard oak cabinets look good.  


Before

Items that had to go:  oak floors (too much oak, they wanted something more durable, and it didn't match the other oak flooring in the adjacent dining room), off-white counters, busy, dated wallpaper, dated light box, backsplash, white refrigerator, oddly shaped island.


Before


After

By pairing the oak with a dark color, the green in this instance, it became a two tone kitchen. We created contrast and the green was a rich accent to the oak. Notice all the elements we added, countertops, backsplash, and new cabinetry were that dark green color. The light color in the space became the oak or oak color. The dark color is the green. When you tie several different elements in a space together with color and value, you make a stronger statement. The slate floor mixed those two colors together beautifully.  That slate is call Imperial Sunset from Thorntree here in Houston.


After

I'm not a fan of making do with outdated materials and old features unless it can be done well and there are valid reasons for keeping them when you remodel. I do think however that this project has a timelessness about it, that the new and old blend really well, and I have to say....those oak cabinets never looked so good!


All before and after photos from my website


Thank you Better Homes and Gardens, for publishing this project again.  It definitely hit home with a lot of people.

If you have a design related question or need some advice on any aspect of interior design, e-mail me HERE.  I might feature your question in a special Q and A blog post! 

Tuesday, June 28, 2011

Progress at the Job Site


Construction is under way on one of my remodel projects.  While many people dread this aspect of a job, I love it.  I really enjoy seeing everything we've planned get pulled together and start to come to life.  At this point, you can really see how making material selections, laying out tile work, lighting, electrical, etc. is so important to do before you start.  I've spent many hours on the design of this large remodel and my time spent up front is paying off.


This was a 1990's contemporary.  It had a very good floor plan, but the chunky, bullnosed style was dated.  It had some unique details like that stepped sheetrock design (which was everywhere!) at the ceiling that made the space seem very horizontal and oppressive.  The 12" x 12" slate (too little and too busy for the wide open space in this house) has been busted out. The dark oak kitchen cabinets and heavy, plain style just had to go. 


The homeowner wanted a traditional style with a light warm color scheme.  She likes beautiful wood mouldings and travertine floors.  A simplified, rectangular island shape and new cooktop location on the end wall of the kitchen, helps the bring the layout up to date and give the kitchen a nice focal point.


It's so nice to see those dark cabinets out and the stepped sheetrock gone.  The space already seems so much brighter and more uplifting.


New crown moulding going in where the sheetrock steps once were.


Travertine floor has begun.  


The larger tile is so much more appropriate for the size of the rooms.  Laying tile on the diagonal opens up the room and the tile appears even larger than it would run straight.


Before - Master tub deck with steps.  It's really very difficult to get into a tub with steps up to it.  It's much easier to sit down on the edge of a tub and swing your legs over to get in.  Even if you step into the tub, at least you're not climbing over the steps or stepping down into the tub from the deck.  I suppose it's to make the tub look grand????


New tub deck without the steps!  We will have some beautiful tile work to come.


Before - The living room fireplace.  Rather lackluster and there are those steps at the ceiling again.


I think it looks better already!


If you're ready to take on a big remodel, contact Aston Design Studio for a timeless interior, custom made for you!

Friday, June 3, 2011

Kitchen Cabinets to the Ceiling

Darryl Carter - Elle Decor

 I'm loving upper kitchen cabinets taken all the way to the ceiling.

It appears to be popular!


 Christopher Peacock - Traditional Home


 Nate Berkus - Elle Decor


 Nancy Boszhardt - House Beautiful


 Kay Douglas - House Beautiful

Whether your ceilings are high or low or if you have a traditional or modern style, it is a great look and gets rid of that dust catcher shelf that people always feel like they have to decorate.


 Meg Braff - House Beautiful


Joe D'Usro - Elle Decor


Jay Jeffers - House Beautiful


This is a before photo of a kitchen remodel I've recently been working on.  10 ft. ceilings and a typical upper cabinet height.  It makes the space look very horizontal and monotonous.  Mostly, it brings the ceiling down.  The homeowner wanted a new white kitchen, but loves the bit of wall color above the cabinets and needed display space for ceramics.


Here's what I proposed.  Cabinets to the 10 ft. ceiling, with color inside and a painted sheetrock hood that would make a more dynamic color statement than a strip above the cabinets.  I think it adds height to the room and gives a strong focal point to the kitchen.  Can't wait to see the end result!

If you have a design related question or need some advice on any aspect of interior design, e-mail me HERE. I might feature your question in a special Q and A blog post!

If you need a fabulous new kitchen design, contact Aston Design Studio to start the process!